PanoMatrix RC2 User Manual
V2.53Redefining Panoramic Aerial Imaging.
PanoMatrix represents a paradigm shift in aerial acquisition—distilling precision, speed, and stability into a unified RC 2 platform.
Engineered to execute 30-gigapixel ultra-resolution workflows with autonomous precision.
Now available for order. Please contact Elton Super720 vr@super720.com
20 minutes. 460 images. A 30-gigapixel capture workflow.
Thirty-billion-level detail — from a single flawless flight.
2026/May/27 Update showcases.
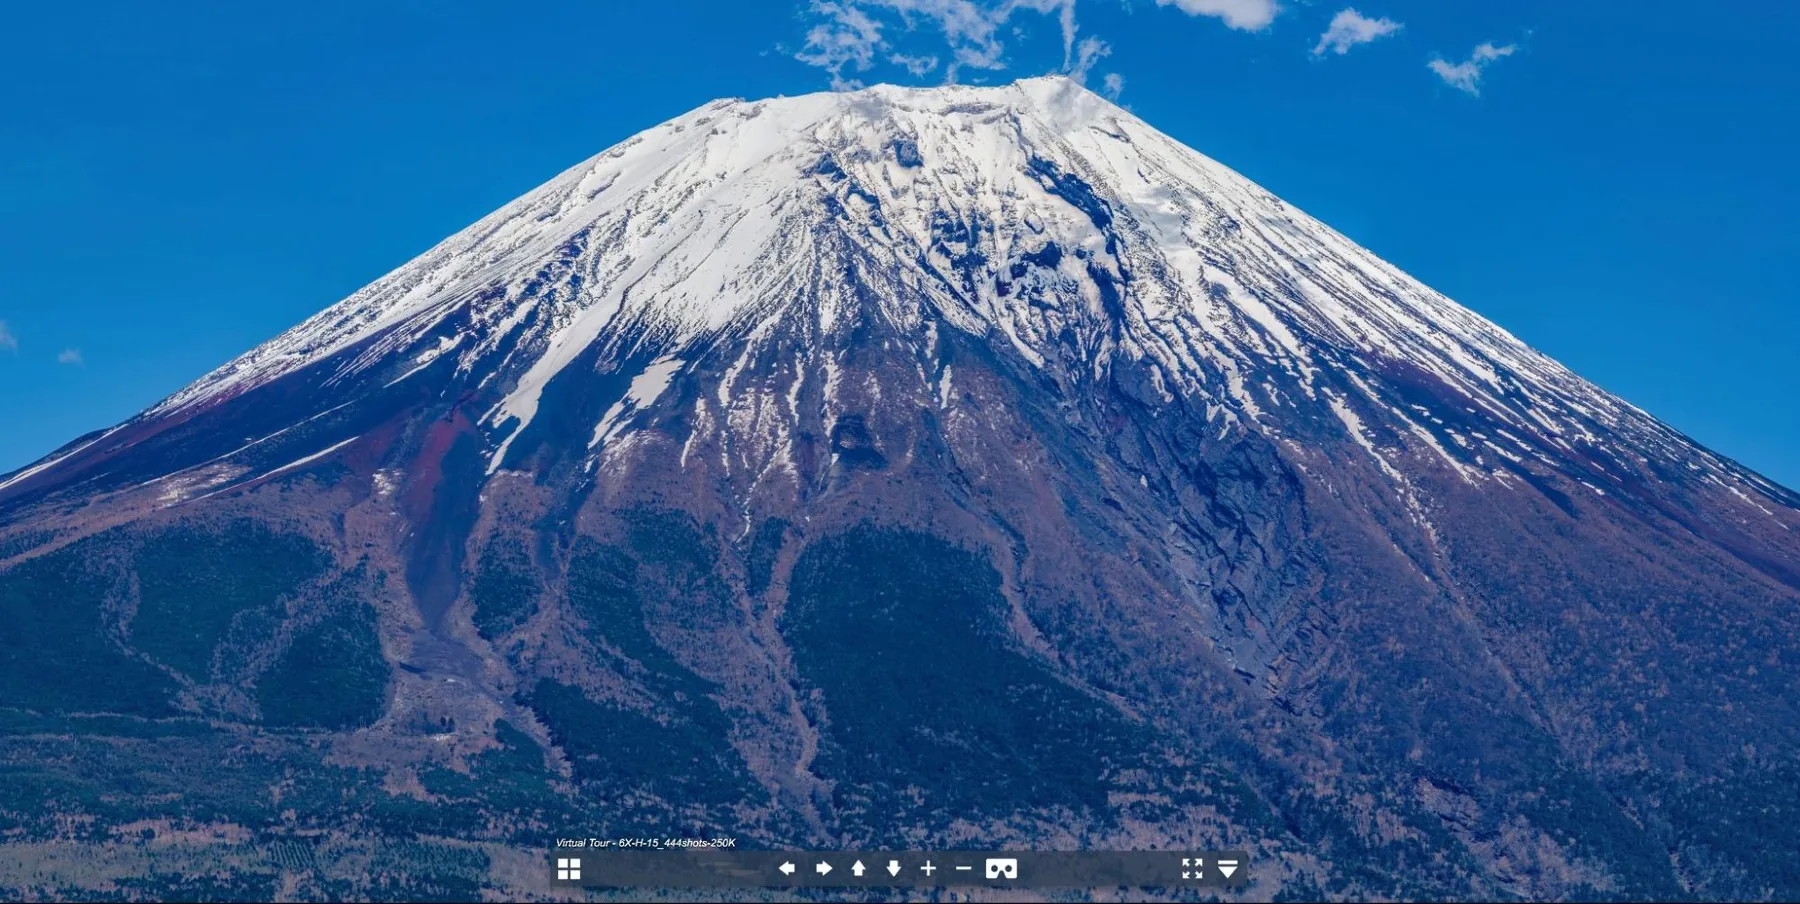
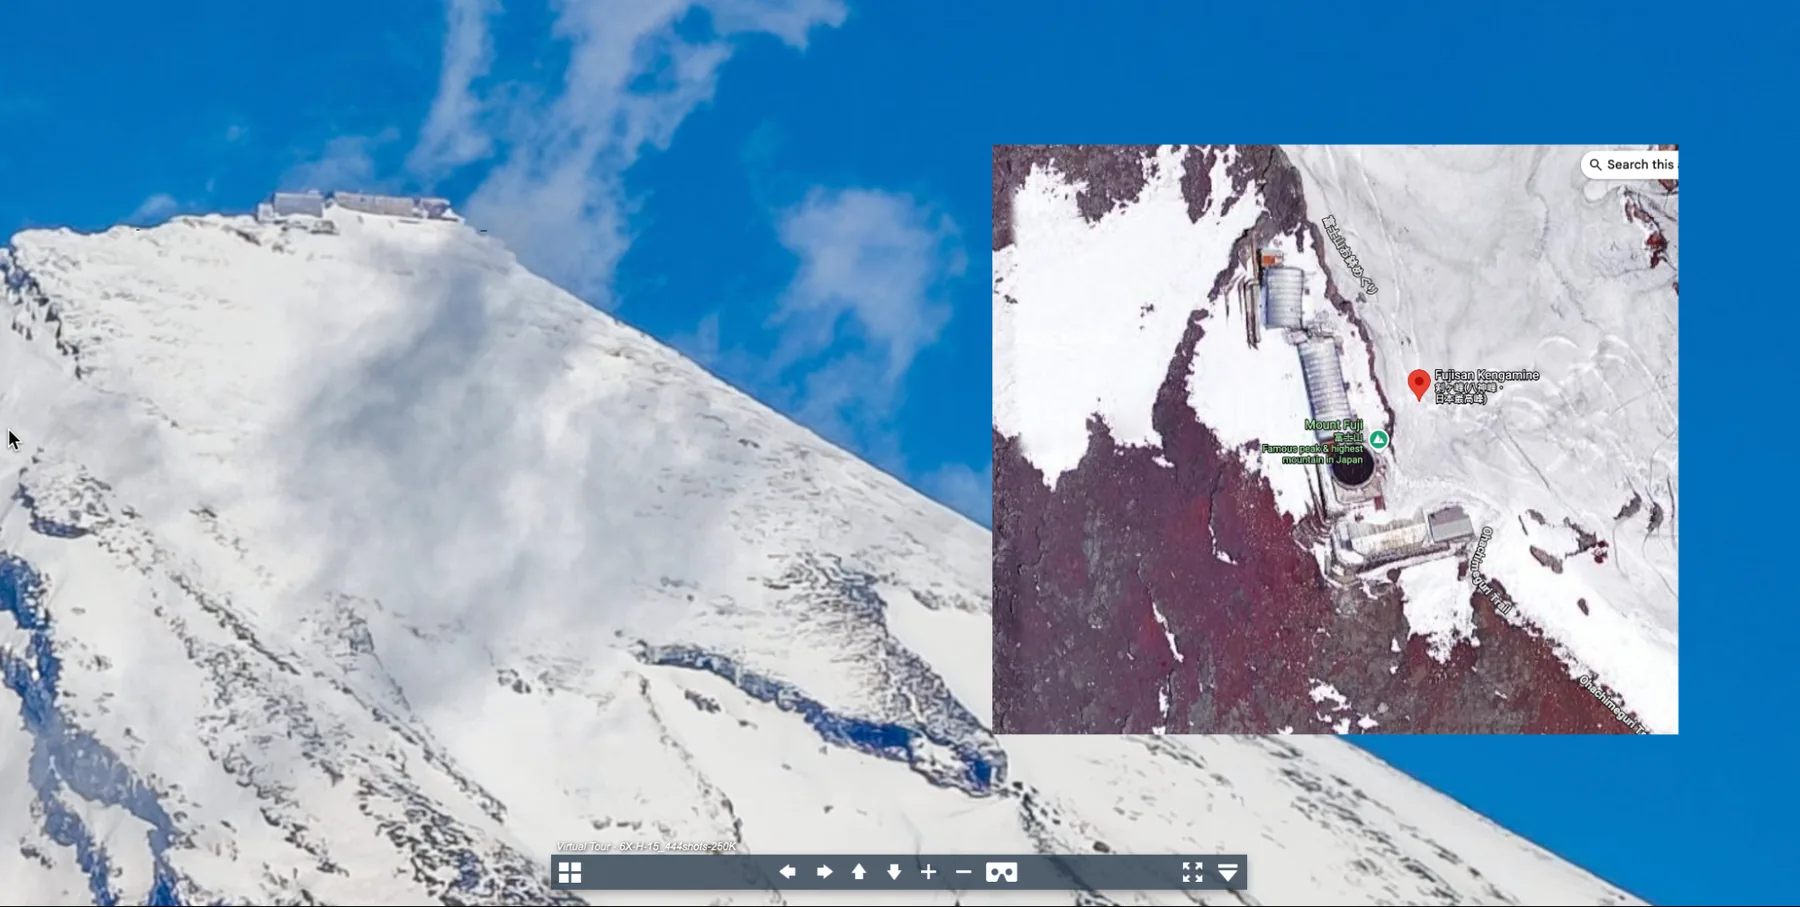
ShowcasesMt.Fuji Japan
250K AEB Panorama / PanoMatrix RC2
◉Open 360° Live Demo
📍LocationGraceland Drone Field (Mt. Fuji, Japan) 793 Hitoana
✈️Altitude145 Meters
📸DroneDJI Mavic 4 Pro (6X Lens)
🎮ControllerPanoMatrix RC2 Custom Module
🖼️Matrix Grid- Lower Part: 444 × 3 AEB / Upper Part: 24 × 3 AEB
🎯Final Resolution250K Panorama Width
Capture & Stitching Workflow:
On location, we updated the PanoMatrix RC2 controller with our latest AEB firmware
and captured a total of 444 bracketed sets, each consisting of 3 exposures:
-0.7 EV, 0 EV, and +0.7 EV.
This covered the area below the horizon.
The controller module was configured with a custom tilt offset of +15° above horizontal,
giving an effective vertical FOV of approximately 202.5°
(180° + 15° tilt + lens angle of view).
444 frames × DJI Mavic 4 Pro 6× telephoto lens × 50MP per frame
→ Final stitched output: ~251K wide
The sky was captured separately using the 1× wide-angle lens,
24 frames total, with a maximum resolution of approximately 64K wide.
Total shooting time: ~35 minutes.
Battery: started at 93%, landed at 18% — approximately 2–3% remaining on touchdown.
Post-Processing:
Color grading: Lightroom Classic
Workflow:
1. Each AEB bracket (3 exposures) merged and exported as a color-graded JPG
2. Ground (6× telephoto) and sky (1× wide-angle) stitched separately in PTGui
3. Final composite assembled in Photoshop
Hardware:
- Laptop with 96GB RAM
- Intel Core i9 processor
- NVIDIA RTX 5090 (24GB VRAM)
- 4TB high-speed SSD (configured to maximize swap space)
Note: Multiple attempts to stitch ground and sky together in a single PTGui session
failed due to memory limitations.
Separating the two layers and compositing in Photoshop resolved all stability issues.
ShowcasesMt.Fuji Japan
64K AEB vs. Non-AEB Panorama
◉Open 360° Live Demo
📍LocationGraceland Drone Field (Mt. Fuji, Japan) 793 Hitoana
✈️Altitude145 Meters
📸DroneDJI Mavic 4 Pro (1X Lens)
🎮ControllerPanoMatrix RC2 Custom Module
🖼️Matrix Grid-Left Part: 41 × 3 AEB / Right Part: 41 × 3 AEB
🎯Final Resolution64K Panorama Width
ShowcasesFo Guang Shan
Buddha Museum, Taiwan
◉Open 360° Live Demo
🖼️Matrix GridDown part 444 + Upper Part 41 × (1 Shot)
🎯Final Resolution251K (Panorama Width)
◉Open 360° Live Demo
📍LocationFo Guang Shan, Kaohsiung, Taiwan Fo Guang Shan Buddha Museum
✈️Altitude115 Meters
📸DroneDJI Mavic 4 Pro (1X Lens vs 6X Lens)
🎮ControllerPanoMatrix RC2 Custom Module
🖼️Matrix GridLeft : 41 × (1 Shot) / Right: Down part 444 + Upper Part 41 × (1 Shot)
🎯Final ResolutionLeft : 64K vsRight: 251K (Panorama Width)
ShowcasesKaohsiung City Landscape
(Location: Kaohsiung Zoo Parking Lot)
◉Open 360° Live Demo
ShowcasesKao-hsiung Main Station
Taiwan. (2025-11-06)
◉Open 360° Live Demo
ShowcasesAsia New Bay Area
Kaohsiung, Taiwan.
◉Open 360° Live Demo
ShowcasesUSC, University of Shih Chien
Kaohsiung Campus. Taiwan.
◉Open 360° Live Demo
ShowcasesMoon World (田寮月世界)
Tianliao District, Kaohsiung, Taiwan
A surreal badlands landscape sculpted by centuries of rain and river erosion, Moon World is defined by its jagged ridges, barren mudstone hills, and an almost alien terrain that bears a striking resemblance to the lunar surface. Featured by CNN as one of the "Top 10 Reasons to Love Kaohsiung." An aerial perspective reveals the full scale of this otherworldly pattern.
◉Open 360° Live Demo
The AEB firmware update has been tested and is ready for release. ( 2026/May/20)
We will proactively contact existing customers to arrange the update,
which is delivered via a physical USB-C cable connected to the controller module
to flash the new matrix shooting data.
If you are an early adopter or previous customer and have not yet been contacted,
please feel free to reach out to us directly.
1|Introduction
1.1 System Overview
The PanoMatrix RC2 is a specialized, hardware-integrated automated capture system engineered upon the DJI RC 2 platform. By embedding custom logic modules directly into the controller's architecture, the system achieves micro-second precision in controlling the DJI Mavic 4 Pro gimbal and camera arrays, facilitating automated, multi-row gigapixel panorama acquisition.
1.2 Operational Objective
Designed for high-fidelity photogrammetry and VR production, PanoMatrix eliminates the inconsistencies of manual aerial photography. It ensures strictly repeatable angular overlap and rigorous pathing efficiency, essential for generating seamless spherical panoramas in dynamic environments.
1.3 Aircraft Compatibility Matrix
The PanoMatrix system is exclusively calibrated for the DJI Mavic 4 Pro Series optical architecture.
- Mavic 4 Pro (Standard Edition)
- Mavic 4 Pro Fly More Combo
- Mavic 4 Pro 512GB / Creator Combo
- All Global and Regional RF Variants (FCC/CE/SRRC)
Incompatibility Notice: This system is NOT compatible with:
- DJI Air, Mini, Avata, or Neo Series
- Mavic 3 Series (Classic / Pro / Enterprise / Thermal)
- Matrice Series (M30 / M350 / M4E)
- Critical: Aircraft running unauthorized custom firmware, "hacked" flight control parameters, or third-party mainboard modifications.
1.4 Hardware Modification & Warranty Disclaimer
IMPORTANT: PLEASE READ CAREFULLY
This product is a hardware-modified DJI RC 2 controller with an integrated external panorama control module (“PanoMatrix RC2”).
To install this system, the RC 2 housing is opened and internal hardware connections are soldered to the main board, and in some cases the shell is drilled to route wiring or attach the external module.
Because of this physical modification, this RC 2 controller must be considered a modified device, not a stock DJI unit.
- As a direct consequence, the original DJI factory warranty for this specific RC 2 controller is permanently void and no longer applicable.
- All support, service, and warranty for this modified RC 2 + PanoMatrix module are provided directly by the modifier / developer, NOT by DJI.
- Your own original Mavic 4 Pro kit (aircraft and the stock RC 2 that came with your Fly More Combo) remains unmodified and keeps its DJI warranty according to DJI’s policy.
The additional panorama control module operates as an independent hardware add-on, it does not alter DJI firmware, flight control logic, or native RC 2 functions.
The controller can still receive official DJI firmware updates, and the PanoMatrix module can be switched on or off at any time without changing DJI system behavior.
Flight safety and regulations
Users are fully responsible for safe flight operations and for complying with all applicable airspace and aviation regulations in their country or region. This system does not override DJI safety features or legal obligations.
Reliability, testing, and service life
The device (including the modified DJI RC 2 controller and PanoMatrix control module) has undergone months of real-world reliability and stability testing, including:
- Continuous run-time stress tests
- Operational load and thermal evaluation
- Handling and environmental tolerance tests
Under normal usage conditions, the expected hardware service lifespan is at least one year.
All DJI RC 2 controllers used in this system are brand-new, original DJI units (serial numbers may be verified).
Prior to delivery, each unit undergoes:
- 24-hour continuous runtime stability test
- Repeated power on/off cycling test
- Full battery charge/discharge cycle
- Function verification of all shooting modes and mapped controls
Warranty Coverage (PanoMatrix RC2 system only)
If hardware failure occurs under normal and compliant usage, we will provide repair or component replacement for the modified RC 2 and/or PanoMatrix module.
The warranty does not apply to damage caused by:
- Physical impact, drops, bending, or crushing forces
- Liquid exposure, high humidity, or water ingress
- Use of non-compliant power sources, wiring, or accessories
- Unauthorized disassembly, additional modification, or soldering
- Lightning, electrical surges, or other force majeure conditions
In such cases, we can still assist with repair or replacement on a paid service basis. Shipping costs, customs fees, and the cost of parts and materials will be the responsibility of the user.
2|System Architecture
2.1 Base Hardware
- DJI RC 2 (brand-new unit, used as integration base)
2.2 Embedded Automation Module
- Custom sequencing firmware
- Gimbal angle stepping logic
- Focal length switching integration
- Automated multi-row grid pathing
2.3 Supported Optical Configurations
| Focal Length | Use Case | Resulting Resolution |
| 1.0× | General environment overview | Fast capture / moderate resolution(64K) |
| 2.5× | Mid-range telephoto detail | ~100,000 px width spherical output |
| 6.0× | High-resolution pano mode | Up to ~251,000 px width spherical output |
2.4 Included Accessories
- Aluminum alloy ball-head joint(1/4” top screw, 3/8” bottom thread, 360° adjustable)
- RC2 aluminum mounting bracket (1/4” screw mount)
- RC2 tempered glass screen protector
- RC2 joystick protection cover
- Soft landing gear set for Mavic 4 Pro (4-piece, 3D-printed, detachable, <2g total)
3|Capabilities
3.1 Automated Panorama Capture
The system executes a predefined multi-row capture sequence with consistent overlap, eliminating the need for manual angular adjustments.
3.2 250K High-Resolution Output
Combines the 6× telephoto lens (lower hemisphere) with the 1× wide lens (upper hemisphere) to produce panoramas up to 250K pixels wide, preserving full RAW format quality with no compression or downsampling.
3.3 Rapid Capture Mode
Completes a full 64K spherical panorama in under 2 minutes using the 1× lens.
3.4 Operational Repeatability
The automated sequence allows consistent output across different shooting sessions and operators.
3.5 Independent System Design
Operates as a standalone hardware logic module—can be turned on or off anytime without affecting the original DJI controller, app functions, or firmware updates.
4|Operational Workflow
4.1 Pre-Planning
- Survey the intended flight site, no-fly zones, and applicable regulations.
- Check for the latest firmware updates for the drone.
- Pre-configure RC2 controller parameters for the PanoMatrix module.
(One-time setup only; do not change later. See later chapter for details.)
- Reconnoiter the takeoff point and shooting point; stay as close to the target location as practical.
4.2 Pre-Flight (Arrive at Designated Takeoff Point)
Mount controller
- Mount the RC2 controller in a fixed position (e.g., tripod or table).
Power On
- Power on the controller; power on the drone and confirm battery level (≥ 95% recommended).
- Turn on the PanoMatrix module power (if required).
Calibration
- Perform gimbal or compass calibration if needed.
Enter DJI Fly App and check Parameters
✅Check storage capacity; confirm microSD card insertion.
✅ Verify still photo parameters: shutter, ISO, and related exposure settings.
(The most recent shooting parameters will be recorded.)
✅Confirm still photo mode is set to Single Shot.
✅Confirm RAW for each focal length.
✅Confirm aspect ratios: 3:2 for 1×, 4:3 for 2.5× and 6×.
If this is your first flight, please make sure to check the gimbal settings in Gain & Expo Tuning. For details, please refer to Chapter 10.
4.3 After Takeoff
Reach Shooting Position
- Ascend to a legal and stable altitude.
- Record position and altitude (controller screenshot is acceptable).
Signal Check (Important)
- After reaching the shooting position, ensure the RC signal strength is at least 3 bars or higher.
- Point the RC antennas toward the aircraft rather than away from it.
- Maintain a clear line-of-sight between the controller and the aircraft (avoid obstructions).
- Do not walk or move through the signal path between the RC and the drone, as this may cause instability or transmission delay.
Camera / Gimbal Check
- Confirm Normal flight mode. (DO NOT CHANGE during capture.)
- Fine-tune camera parameters in DJI Fly app; re-confirm.
- In the DJI Fly app, select the required focal length (1× / 2.5× / 6×).
- On the controller, press the C1 shortcut twice to ensure the gimbal starts at 0° level.
- (1X-UP-70 on first-generation firmware only: tilt the gimbal up to +70° before starting. With firmware V2.53 leave the gimbal level at 0° — the module raises it automatically.)
PanoMatrix Capture Operation
- On the matrix module, press the Mode button (right side) to select the corresponding shooting program.
- Double check the Gimbal level.
- Press Start button (left side) to confirm and start automated capture.
⚠️ WARNING ⚠️ Hands OFF during capture.
Any input may interrupt the sequence and result in missing or misaligned frames.
Monitor Throughout whole flight
- Confirm shutter is firing continuously (set device volume to maximum if monitoring by sound).
- Check GPS stability and aircraft drift.
- Continue until the PanoMatrix progress bar reaches 100% and all frames are completed.
4.4 After Landing
Backup or Change Card
- Without powering off, connect and copy files to a high-capacity SSD.
(Or remove the TF/microSD card and replace it with a new one.)
- Quickly verify the file count is complete.
- Randomly check several files for integrity.
- Confirm resolution and aspect ratio are correct.
5|Comparison with DJI Fly App Panorama
5.1 Single-Frame Resolution Comparison
Comparison between PanoMatrix automated capture and the DJI Fly App’s built-in Panorama mode.
PanoMatrix RC2
- Captures at the full native resolution of each lens (RAW format).
- 6× telephoto lens single-frame resolution: 48 MP
- No downsampling, no compression.
- Ensures maximum detail for stitching and post-production.
DJI Fly App Panorama
- Uses reduced-resolution processed frames.
- Output frames are downsampled to roughly ¼ of the native resolution.
- Designed for quick previews, not ultra-high-resolution production workflows.
Result
PanoMatrix retains the full imaging capability of the sensor, allowing far higher stitch quality, dynamic range, and detail recovery compared to the DJI Fly App’s built-in pano capture.
1.0× — Hasselblad Camera ( Native DNG Res. 12,288 × 8,192)
| Focal Length | Method | Image Count | Coverage (°) | Single Frame Resolution |
| 1.0× (28mm) | DJI Fly Pano | 43 | 360 × 360 | 6,144 × 4,096 |
| 1.0× (28mm) | PanoMatrix Module | 41 | 360 × 360 | 12,288 × 8,192 |
2.5× — Medium Tele Camera ( Native DNG Res. 8,064 × 6,048)
| Focal Length | Method | Image Count | Coverage (°) | Single Frame Resolution |
| 2.5× (70mm) | DJI Fly Pano | 155 | 360 × ~335 | 4,032 × 3,024 |
| 2.5× (70mm) | PanoMatrix Module | 76 | 360 × ~200 | 8,064 × 6,048 |
6.0× — Tele Camera ( Native DNG Res. 8,192 × 6,144)
| Focal Length | Method | Image Count | Coverage (°) | Single Frame Resolution |
| 6.0× (168mm) | DJI Fly Pano | Not supported | – | – |
| 6.0× (168mm) | PanoMatrix Module | Variable (444) | 360 × ~195 | 8,192 × 6,144 |
Summary:
Downsampled. DJI Fly Pano is faster but forces reduced-resolution output. Panorama DNG files in DJI Fly are downsampled and do not retain native resolution.
PanoMatrix preserves full sensor resolution and supports 6× long-tele matrix capture, which DJI does not provide.
5.2 Final Panorama Output Comparison
Comparison of the complete stitched equirectangular panorama from each workflow.
PanoMatrix RC2 Capture Workflow
- 6× telephoto (lower hemisphere) + 1× wide lens (upper hemisphere)
- Full-resolution RAW stitching
- Final output: ≈ 250,000 px width × 125,000 px height
- ≈ 31.5 billion pixels (31.5 gigapixels) per panorama
- Seamless sphere with high-frequency detail preserved
DJI Fly App Panorama Output
- Typical stitched output: ≈ 8K – 12K width
- Made from downsampled input frames
- Suitable for social media, not for professional archival or VR production
- Lower resolving power and limited fine-detail retention
Result
PanoMatrix delivers over 20–30× more resolving power than the DJI Fly App panorama, producing true ultra-high-resolution results suitable for professional VR, digital archiving, and large-format visualization.
1× (Wide Angle / Main Camera)
| Comparison Item | Programmatic Matrix (1×) | DJI FLY APP (1× Panorama) | Note |
| Number of Shots | 41 images | 43 images | — |
| Capture Time | ~2 min 11 sec | ~47 sec | — |
| Single Image Resolution | 12,288 × 8,192 (100 MP) | 6,144 × 4,096 (≈25 MP) | Gimbal tilt to +70° at start (first-generation firmware; automatic on V2.53) |
| Stitched Output Resolution | 63,962 × 31,981 | 31,932 × 15,966 | ~4× resolution difference |
| Coverage | Full Sphere(Full Res.) | Full sphere(Downsampled Output) | — |
2.5× (Medium Telephoto)
| Comparison Item | Programmatic Matrix (2.5×) | DJI FLY APP
(2.5× Panorama) | Note |
| Number of Shots | 76 images | 155 images | — |
| Capture Time | ~3 min 00 sec | ~4 min 03 sec | — |
| Single Image Resolution | 8,056 × 6,040 (48 MP) | 4,024 × 3,016 (12 MP) | ~4× resolution difference |
| Stitched Output Resolution | 101,002 × 50,501 | 50,500 × 25,250 | — |
| Coverage | Lower Hemisphere ~360° × 200° | Full sphere ~360° × 340° | Matrix capture intentionally excludes upper sky, to be replaced later for efficiency |
6|Distribution & Pricing
• Price: USD 1,500.
• Free Optical Expansion Kit (worth USD 300)
6.1 Standard Package Contents
The PanoMatrix RC2 distribution package includes:
• PanoMatrix-integrated DJI RC 2 (brand-new, pre-configured)
• Embedded automation hardware module
• RC2 accessory kit
• Documentation & online onboarding support
• Future workflow template updates
6.2 Pricing
The PanoMatrix RC2 hardware kit is priced at:
USD 1,500
(tax not included; international shipping paid by customer)
Shipping options include EMS/Post, DHL, or FedEx.
Import duty varies by region and is the responsibility of the customer.
6.3 Ordering & Contact Information
To place an order for the PanoMatrix RC2 Controller (Early-Bird Batch),
please provide the following details:
• Full Name
• Shipping Address (including postal code)
• Phone Number
• Preferred Delivery Method (DHL / FedEx / Postal EMS)
After receiving your information, we will send you a formal quotation and payment instructions.
Pricing
• Standard Price: USD 1,500
• Optical Expansion Kit (Value USD 300) — included for orders
• Import taxes and duties are paid by the customer according to your local regulations.
Payment Options
• PayPal
• International Wire Transfer (bank details provided upon request)
Delivery Time
Production takes approximately 10 - 14 days after order confirmation.
International delivery typically requires 4 – 10 days, depending on destination and customs processing.
Contact
For ordering, questions, or sample dataset requests, please reach out via:
International Phone Support:+886-985156-000
Email:vr@super720.com
Messenger: https://www.facebook.com/superz.su/
Download links for RAW datasets and workflow materials will be provided to your verified email address after contact.
Payment Options
1. PayPal
Emailvr@super720.com
2. International Wire Transfer (Corporate Account)
Bank NameCathay United Bank
Account NameFRONTWAVE DIGITAL IMAGE CO., LTD.
Account Number005087273328
SWIFT CodeUWCBTWTP
3. International Wire Transfer (Personal Account)
Bank NameCathay United Bank
Account NameSU CHUN JUNG
Account Number052080040121
SWIFT CodeUWCBTWTP
Currency
All payments are processed in USD.
7|Software Support & Training Resources
7.1 Included Software Resources
Early units include access to the following digital resources:
- Sample DNG datasets captured using 1× / 2.5× / 6× workflows
- PTGui stitching templates for all supported modes
- Preview JPGs for workflow verification
- Reference stitched panoramas for output comparison
To request sample files, please contact us via private message or email:
vr@super720.com
The sample dataset currently provided maintains correct resolution and pixel integrity,but the image quality is not yet at its optimal level.
This is mainly due to the seasonal haze affecting our location in Kaohsiung, Taiwan.
Additionally, a recent typhoon has further reduced visibility and atmospheric clarity.
Better weather conditions are expected next week,and we will conduct a new capture session to provide higher-quality footage for formal presentation and evaluation download.
The sample dataset now lives on the Post-Production page, together with the stitching walkthrough it belongs to. Go to the dataset download →
7.2 Training Materials
A complete training video series is currently in production.
It will cover the full PanoMatrix workflow, including:
- Real-time screen recordings of controller operation and setup
- On-site field tutorials, including safety checks and equipment handling
- Post-processing walkthroughs, showing PTGui configuration, output optimization, and high-resolution export guidelines
All materials will be made available for download as they are completed, supporting both first-time users and professional operators.
7.3 Continuous Workflow Updates
Owners of the PanoMatrix RC2 system will receive:
- Updated PTGui templates
- Workflow refinements
- Optional new shooting modes
- Additional post-production resources
These updates ensure long-term consistency and help users maintain high-efficiency, high-resolution panoramic output across different shooting environments.
7.4 Sky Asset Exchange Program
To support long-term post-production workflows, PanoMatrix RC2 owners gain access to the following ongoing benefit:
We will periodically provide high-quality sky and cloud image assets,free for all system owners and cleared for commercial use with no additional licensing fees.
For users who require specific sky conditions—such as seasonal colors, cloud types,or atmospheric variations—we also welcome mutual sky-asset exchange.
All exchanges follow principles of fair use, mutual respect, and voluntary sharing between creators.
Recommended Capture Workflow (for users who wish to exchange sky assets)
- Use the 1× wide-angle camera
- Tilt the gimbal upward to +70° (first-generation firmware only — with firmware V2.53 the gimbal stays level at 0° and the module raises it automatically)
- Start a full PanoMatrix automated sequence
- This produces a 64K high-resolution sky capture
- The full sequence contains approx. 41 frames, but for exchange purposes, only the top 16 frames (sky hemisphere) are required.
This method provides clean, large-area sky plates suitable for professional compositing,and mutual exchange significantly reduces production time for all participating creators. If you have additional ideas or wish to request a specific sky condition, feel free to contact us anytime.
8|About the Creator of PanoMatrix
8.1 Creator Profile|Elton Su
Elton Su / 蘇俊榮 Chin Jung Su.
Founder & Director, Frontwave Digital Image Tech, Co., Ltd.
Founder & Lead VR Director of Super720.com
Elton Su has spent more than twenty years in the fields of VR, XR, aerial imaging,
panoramic photography, and digital cultural content production.
His expertise spans project management (PMP), database-driven interaction design,
VR film technology, and UX development — along with over a decade of professional UAV and panoramic directing experience.
He previously served as Senior Manager of Taiwan’s full-space panoramic imaging team,overseeing 3D modeling, panoramic capture, immersive hardware systems,
360-degree video production, and UAV cinematography.
His portfolio includes more than a thousand government and enterprise projects,
covering museum digital archiving, educational VR tours, XR exhibitions, and commercial VR film productions.
He is an active Taiwan-based member of the
IVRPA — International Virtual Reality Professionals Association.
The PanoMatrix system was conceptualized, engineered, and field-tested under his direction,built on the principles of precision, repeatability, and ultra-high-resolution productivity.
8.2 Company Background|Frontwave Digital Image Tech, Co., Ltd.
Founded in 1999 and headquartered in Kaohsiung, Taiwan,Frontwave Digital Image Tech operates under the brand Super720.com ,with more than two decades of experience and over a thousand completed projects acrossVR/XR production, panoramic imaging, immersive installations,3D digital archiving, aerial cinematography, and interactive system design.
The company works extensively with government agencies, cultural institutions, universities, commercial enterprises, museums, and international exhibition partners.
Core competencies include:
- 360° / VR content production
- 3D scanning and digital cultural archiving
- Professional UAV imaging
- Immersive projection and multi-display installations
- XR / virtual tour app development
- Cultural & urban digital media creation
The PanoMatrix RC2 System is one of Frontwave’s flagship innovations, combining decades of production experience with engineering-level reliability,designed to empower global UAV creators with a stable,ultra-high-resolution automated panoramic workflow.
9|Important Notices and User Responsibility
9.1 Warranty
- Because the RC 2 controller has been physically modified, the original DJI warranty is no longer valid for this unit.
- The modification does not alter any DJI firmware or control logic.
- However, it does involve opening the housing and internal hardware soldering, so this RC 2 must be considered a hardware-modified unit. All native DJI functions remain available and can continue to be used as normal.
9.2 Legal Compliance
- Users are responsible for complying with their local aviation laws, including but not limited to:
• Flight altitude limitations
• Visual line-of-sight requirements
• No-fly zones
• Registration and insurance (where applicable)
- The PanoMatrix system does not bypass or modify any DJI flight restrictions.
9.3 Shipping and Customs
- This product may be shipped internationally. Import taxes, customs fees, or duties are the responsibility of the buyer, and may vary by country.
- The unit will be fully tested and documented before shipping. A shock-protected, moisture-resistant package is used to reduce transport risk.
9.4 Returns and Exchanges
- Due to the nature of customized hardware modification and calibration, returns or refunds are not accepted once the device has been shipped.
- Support will be provided to ensure correct installation and use.
9.5 Repair and Damage
- Damage caused by impact, crash, weather, sand, moisture, improper storage, or incorrect installation is the responsibility of the operator.
- The carbon-fiber 3D-printed mount is durable but may fatigue if repeatedly installed and removed. Replacement mounts are available if needed.
9.6 Flight Operation
- Use only genuine DJI propellers.
Third-party propellers may introduce vibration, imbalance, or increased load that affects gimbal stability and flight safety.
- Do not use propeller guards when operating.
Propeller guards can increase wind resistance and airflow turbulence, which may amplify gimbal vibration, especially when telephoto focal lengths are used.
- The following items are non-standard optical accessories included in the expansion kit (if applicable):
• Wide-angle adapter
• ND filters
• Carbon-fiber composite 3-piece gimbal mounting interface
- Install optical accessories only after the gimbal has completed its startup calibration.
- Remove all optical accessories before folding, transporting, storage, or prolonged travel.
- Sudden braking, high-angle rotation, or aggressive maneuvering may temporarily increase vibration when optical accessories are mounted. Maintain smooth and controlled flight movement during panoramic capture.
9.7 Safety
- If abnormal vibration, gimbal overload warnings, or image shift is observed, land immediately and inspect the mount.
- Follow all applicable drone regulations in your region.
Including altitude limits, no-fly zones, VLOS rules, registration, and licensing.
- Always maintain Visual Line of Sight (VLOS).
Avoid operating in conditions where the aircraft cannot be visually tracked.
- Do not use matrix capture mode in strong wind or adverse weather conditions.
Wind instability may lead to alignment errors and stitching failure.
- After starting matrix automation, keep your hands off the joysticks unless an emergency occurs.
Manual input during the sequence may disrupt the motion path and ruin the capture set.
- Ensure strong and stable signal between aircraft and controller.
Aim antennas toward the aircraft and avoid physical obstructions.
- Fly in an environment with sufficient vertical and horizontal clearance.
Avoid close proximity to buildings, towers, power lines, or cliff faces.
- Optical expansion accessories (Wide / ND / Mounts) are not intended for matrix panorama mode.
Remove all non-OEM front-mounted accessories before starting automated capture.
- Always use original DJI propellers and avoid propeller guards during panoramic capture.
Prop guards may reduce stability and wind resistance.
- Regularly inspect gimbal movement and lens cleanliness.
Long-focal capture (6X) amplifies even small vibrations.
11|Recommended Camera Settings (Revised)
Before configuring camera settings, ensure the aircraft is hovering stably. Some settings may also be pre-adjusted before takeoff to reduce airborne workload.
- ISO
- Daytime: ISO 100
- Dusk / Night: Increase as needed but keep shutter ≥ 1/30s to avoid motion blur.
- Shutter Speed
- Adjust based on lighting conditions
- Recommended 1/150 ~ 1/200 or faster.
- White Balance
- Start with Auto WB
- Then disable Auto and lock the value once the correct temperature is found.
- Focus Mode
- Image Format
- Resolution (Use highest available when possible)
- 1×: 100 MP
- 2.5×: 48 MP
- 6×: 50 MP
PanoMatrix is compatible with all resolutions.
- Image Aspect Ratio (Critical)
- 1×: 3:2
- 2.5×: 4:3
- 6×: 4:3 (mandatory)
⚠️ Do NOT use 16:9. It provides insufficient coverage and will cause incomplete panorama stitch
- Gimbal Starting Angle
- Double-press C1 → Return gimbal to Level 0°
- 2.5× / 6× start at 0°
- 1× starts at +70° on first-generation firmware; with V2.53 it starts level at 0°
12|Matrix Capture Programs
Mode (1)
6X-V-0 (Vertical)~372 imagesUses the 6× telephoto Lens
Coverage: ~360° × 187° (Lower Hemisphere)
Procedure:
- Start at 0° (level horizon)
- Tilt the gimbal downward in ~7.5° increments
- Continue until -90° (nadir)
- After each vertical column, rotate the drone ~10° horizontally and continue
- Approximately 36 vertical columns, 12 tilt steps (372 images)
Characteristics:
- Minimal airframe rotation → Faster capture speed
- Best for stable daylight conditions with minimal cloud movement
Mode (2)
6X-H-0 (Horizontal)~372 imagesUses the 6× telephoto Lens
Coverage: ~360° × 187° (Lower Hemisphere)
horizontal, layered sweep mode.
- ~36 shots per horizontal layer
- Move downward layer-by-layer
- ~12 layers from 0° to -90°
Best for sunrise/sunset or fast-changing light conditions.
Mode (3)
6X-H-15 (Extended Vertical Coverage)~444 images
Coverage: ~360° × 202° (Lower Hemisphere)
- Before starting, set the gimbal to +0°
- PanoMatrix will AutoStart at +15° (level horizon)
- Tilt the gimbal downward in ~7.5° increments
- Continue until -90° (nadir)
- After each vertical column, rotate the drone ~10° horizontally and continue
- Approximately 36 vertical columns, 14 tilt steps (444 images)
- Optic: 6× Telephoto
- Pattern: Row-by-Row (Horizontal Sweep)
- Coverage: +15° (Above Horizon) to -90° (Nadir).
- Utility: Best for scenes with tall structures (skyscrapers, mountains) where the subject exceeds the horizon line.
Mode (4)|2.5X-V-0 (Vertical)|~76 images|
Coverage: ~360° × 200° (Lower Hemisphere)
Uses the 2.5× medium telephoto lens.
Ideal for urban architecture, valleys, and mid-range scenic compositions.
Mode (5)|2.5X-H-0 (Horizontal)|~76 images|
Coverage: ~360° × 200° (Lower Hemisphere)
Uses the 2.5× medium telephoto lens.
Uses horizontal layered sweeps, suitable for unstable lighting environments.
Mode (6)|1X-UP-70 (Full Sphere)|~41 images|
Coverage: 360° × 360°
Uses the 1× wide angle lens.
Captures a complete full spherical panorama.
On first-generation firmware, tilt the gimbal to +70° before starting — this was the only mode requiring a manual tilt. With firmware V2.53 no manual tilt is needed: leave the gimbal level at 0° and the module raises it automatically.
The system will automatically capture downward in circular layer.
PanoMatrix Design Philosophy
Both 6× and 2.5× modes intentionally capture only the lower hemisphere because:
- Ground and architectural surfaces have high detail requirements
- The upper hemisphere consists mostly of sky and cloud gradients
- Capturing the sky using telephoto would multiply the shot count and time, increasing environmental risk
Thus, PanoMatrix uses a Hybrid Matrix Workflow:
Lower Hemisphere (detail-critical areas) → Captured using 6× / 2.5×
Upper Hemisphere (sky) → Captured quickly using 1× wide lens, then composited in post
Advantages:
- Significantly reduced total capture time
- Improved stability against wind and light variation
- Maximum effective resolution where it matters
Please note: We may have a new version of firmware update that will change the button function. (2026.Apr.21 Update)
This module panel features only two buttons to streamline the operational workflow, intentionally avoiding the addition of extra reset or function keys. We have integrated an On-Off Switch on the top of the module; in addition to controlling power, it also serves to reset the shooting process.
"You may power off the module at any time to perform a reset without affecting the operation of the RC2 controller. On firmware V2.53 you no longer need this to stop a running sequence — press and hold the Mode button for 5 seconds instead."
(250K) Maximum Stitching Output Explanation
Maximum Stitching Output (6× Telephoto Mode)
When using the 6× telephoto camera, each image is captured at approximately 48MP resolution.
The PanoMatrix 6× capture mode records 372 images for the lower hemisphere (≈ 360° × 187° coverage).
If desired, you may extend the capture by adding an upward tilt of +15°, resulting in +72 additional images, to assist in sky reconstruction during post-processing.
Stitched Equirectangular Output Resolution:
- Width: 251,000 pixels
- Height (2:1 equirectangular aspect ratio) : 125,500 pixel
Total Pixel Count Calculation:
251,000 * 125,500 = 31,500,500,000pixels ≈ 3.15 Gigapixels
This output level belongs to ultra-high-resolution gigapixel-class panoramic imaging, suitable for:
- Large-format immersive displays
- Scientific landscape documentation
- Cultural heritage digital archiving
- High-spec VR viewing and inspection workflows
13|Ultra-High-Resolution 360×180 Capture Strategy
(Updated Modes)
To produce a full 360×180 sphere panorama at ~250,000 px width, the workflow is built around two capture components:
- Upper hemisphere (Sky) — captured with 1× UP-70
- Lower hemisphere (Main body) — captured with one 6× matrix mode (6X-H-0 or 6X-H-15) based on scene geometry
There is no separate “6× upper-band” mission required by default in the updated workflow.
Step 0 — Pre-check and Mode Selection (6X-H-0 vs 6X-H-15)
Before you start recording, hover at the intended capture point and do a quick scene check using the 6× tele lens:
- Set the gimbal to 0° level (horizon level).
- Slowly yaw (rotate) the aircraft 360° and observe the live view.
- Evaluate whether any tall objects (buildings, mountains, poles, trees, ridgelines, etc.) rise into the frame in a way that would benefit from additional upward coverage at 6×.
If there is no significant obstruction above the horizon line (i.e., your 0° level sweep covers the important structures cleanly):
→ Use 6X-H-0
If there are tall/close objects that enter the upper portion of the frame and you want them captured at full 6× detail:
→ Use 6X-H-15 (adds upward coverage)
Step 1 — Lock the Capture Position (Repeatability Setup)
To ensure you can repeat or re-fly the exact same pano position if needed:
- Hover in place and point the camera straight down to find a clear, recognizable reference (roof feature, pavement pattern, corner edge, water tank, etc.).
- Record:
- The exact altitude
- The crosshair alignment/reference point
- Any additional notes (wind direction, nearby obstacles)
This allows you to return to the same location later (even on a different battery) and still stitch successfully.
Step 2 — 1× Sky Capture (1X-UP-70)
On first-generation firmware this was the only step requiring a manual upward gimbal tilt. With firmware V2.53 it is handled automatically.
- Switch to the 1× wide lens.
- Manually tilt the gimbal to +70° (first-generation firmware only — with firmware V2.53 the gimbal stays level at 0° and the module raises it automatically).
- Select 1X-UP-70 and execute the capture.
- The sequence captures 41 images (full 1× spherical set at ~64K-level coverage).
- For the 250K workflow, we typically use only the upper 16 images for the sky hemisphere.
- Still, we recommend shooting the full 41-shot set because it is quick and provides safer options.
After completion, you may stop/reset the module (if needed) before proceeding.
Step 3 — 6× Lower Hemisphere Matrix (Choose ONE Mode)
Switch to the 6× tele lens and ensure the gimbal starts at 0° level (unless the chosen mode automatically offsets).
Option A — 6X-H-0 (Standard)
Use this when the 6× horizon-level sweep is sufficient.
- Start at 0° level
- The gimbal steps by 7.5° per row
- Captures 12 horizontal rings
- Each ring captures 36 shots
- Total: 372 images
Option B — 6X-H-15 (Extended Upward Coverage)
Use this when tall/close structures enter the upper portion of the 6× frame and you want full 6× detail.
- The system raises the gimbal to +15° and expands coverage
- Captures 14 horizontal rings
- Each ring captures 36 shots
- Total: 444 images
- These sequences must be allowed to complete fully.
- If interrupted mid-way (battery, safety, etc.), there is no resume function — the partial set is not usable and you must re-fly and re-shoot the full sequence.
Step 4 — Battery Planning (Rule of Thumb)
Battery use is predictable and should be evaluated before pressing Start.
Rule of thumb (typical conditions):
- About 1% battery per ~10 photos (approximate)
So you should reserve:
- ~38% for a full 372-shot run
- ~45% for a full 444-shot run
In practice, one battery should be sufficient to:
- Fly to the capture point (if not far)
- Hover, check framing, select mode
- Shoot 1× (41) + one 6× sequence
- Return safely
If your takeoff point is far from the capture point, you will waste battery on transit. In that case, physically move the takeoff/landing location closer to the capture position.
Step 5 — Immediate Data Backup (Mandatory)
After landing:
- Back up image files immediately to your SSD/workstation.
- Verify image counts (1× set + selected 6× set) before deleting anything from storage media.
14|How to Avoid “Missed Shots”
Why do missed shots occur?
The PanoMatrix system uses a hardware IC module connected to the RC, which simulates manual gimbal movement and shutter triggering.
This means that:
The remote controller must maintain continuous, stable command transmission to the drone.
If the signal link is interfered or temporarily weakened, a millisecond-level shutter command may not be received → resulting in a missed frame.
This is different from DJI “Task Upload / Waypoint Missions,” because the camera trigger is not preloaded into the drone — it is executed live.
How to Avoid Missed Shots
1) Maintain Communication Link Quality
- Keep clear line-of-sight (LOS) between RC and aircraft
- Aim the RC antennas toward the aircraft
- Avoid people or objects walking between RC and drone
- In high interference zones (dense Wi-Fi, skyscrapers, stadiums, ports):
- Fly closer vertically, rather than far horizontally
- If signal bars drop / link turns red → pause capture, adjust altitude or operator position, then resume
2) Optimize Flight Position & Conditions
- Take off from open areas
- Avoid environments with:
- Strong electromagnetic interference
- High-voltage lines
- Large outdoor LED screens / billboards
- In strong winds, increase shutter speed and slightly increase flight altitude to reduce attitude compensation errors
3) Camera & Exposure Settings
- For telephoto (2.5× / 6×), use:
- Exposure Lock (AEL)
- Fast shutter speed
- Keep consistent RAW exposure for the lower hemisphere
- For upper-sky captures, exposure may be adjusted separately to retain cloud gradients (as described previously in the SOP)
4) Human Factors
- Do not touch the RC screen
- Do not press physical buttons
- Do not switch menus
Any UI or mode interruption will break the matrix execution and cause missed shots.
5) Storage Speed
- If the microSD card is too slow, the buffer will stall → causing missed captures.
- Recommendation:
- Use internal storage (64GB / 512GB) as the default recording location
- A full high-resolution matrix (≈600 RAW DNG shots) consumes roughly ≈45–50GB
- Always back up after each flight before switching batteries.
15|250K Panoramic Capture Workflow (On-Site SOP)
- Arrival
- Check environment, airspace restrictions
- Verify GPS lock and wind conditions
- Safety Check
- Inspect drone, propellers, gimbal, batteries
- Battery ≥ 95%
- Do NOT use third-party propellers or prop guards (affects rotation precision)
- Controller & Display
- Mount controller on tripod or stable surface
- Flight Mode: Normal
- Brightness: Max
- Sound Level: Max (Enable shutter sound)
- Camera Settings
- ISO 100 / F2.8 / Shutter ≥ 1/30s
- Fix white balance
- Do not change zoom during capture
- Takeoff & Positioning
- Ascend to a safe altitude (≥120m recommended)
- Press C1 → C1 to level gimbal to 0°
- Start Automated Matrix Capture (PanoMatrix Controller)
| Lens Mode | Shots | Coverage |
| 1× | 41 shots | Full Sphere (+70° pitch start — automatic on V2.53) |
| 2.5× | 76 shots | Lower Hemisphere 360×90° |
| 6× | 372 shots | Lower Hemisphere 360×90° |
- Do not touch joysticks or gimbal wheels during capture
- Landing & Backup
- Land with ≥18% remaining battery
- USB-C file transfer (~36GB ≈ 1 minute)
- Perform quick missing-frame check on-site
16|250K Aerial Panorama Post-Processing Workflow
Workstation
- MSI Laptop / i9 / RTX 5090 / 96GB RAM
- Photoshop scratch space ≥ 600GB
Steps
- Lightroom Color Grade + Export JPG (~1.5 hrs)
Optional: Topaz Photo AI denoise/sharpen
- PTGui Stitching
- Seam / mask refinement (~40 min)
- Preview JPG export (~20 min)
- High-resolution TIFF export (~1 hr)
- Photoshop Sky Patch & Merge
- Patch sky at 64K scale → save PSB
- Scale final result to 251K
- Copy patched layers from PSB → into TIFF
- Merge and export BigTIFF (Uncompressed)
- Krpano Multi-Resolution Tiling & Deployment
- Generate multi-resolution tiles
- Upload to AWS S3 / optional CDN
17|Legal Disclaimer
18|Known Hardware Limitations
1. LED Power Indicator Visibility
The external PanoMatrix module housing partially overlaps the RC’s original LED power indicator.
To maintain visibility, a clear light-transmissive adhesive window is applied on the top surface of the module.
This allows the battery level LEDs to remain visible when viewed from above.
2. Module Position Is Intentionally Offset
The module is intentionally not mounted at the exact center of the controller.
This is due to the internal PCB trace layout — the central region contains important circuitry.
Drilling or mounting directly in the center would risk damaging the motherboard.
Therefore, the module is positioned slightly to one side to ensure hardware safety and reliability.
Summary
These design choices are intentional and based on electrical safety considerations.
They do not affect flight control, signal strength, power performance, or any DJI system functionality.
19|Copyright & Intellectual Property
The terms “DJI,” product names, trademarks, interface images, and product photographs included in this document are the intellectual property of DJI (SZ DJI Technology Co., Ltd.).
This document is intended solely for technical research, workflow demonstration, and educational purposes. It is not affiliated with, authorized by, endorsed by, or produced in collaboration with DJI.
Any product images or UI screenshots herein are provided for explanatory and instructional reference only, and are not used for commercial promotion, co-branding, or to imply official association.
All hardware modifications and operational workflows described are independent third-party developments and are not part of DJI’s official specifications, support services, or warranty policies.
Users assume full responsibility for any equipment modification, flight activity, or commercial use based on this document.
Neither DJI nor the author of this document shall be held liable for any direct or indirect consequences arising from such usage.
The following images are original photographs, without any alteration or AI enhancement.
20|Optical Expansion Kit
0.65× Wide-Angle Adapter (18–20 mm, video-optimized)
High-End CNC 0.65× Wide-Angle Expansion Module
Made for Ultra-Wide Video.
A wider, more cinematic perspective for the Mavic 4 Pro.
This module is built with a CNC-milled aluminum mounting system, precisely fitted to the Mavic 4 Pro’s triple-camera bayonet structure.
The optical element uses a brand-new DJI original Mavic 3 series wide-angle lens, refined and adapted through precision machining to achieve optical performance comparable to native DJI lenses.
With the 0.65× factor, the original 28 mm equivalent lens expands to approximately 18–20 mm, delivering a noticeably broader, more cinematic field of view — ideal for aerial video, spatial coverage, and wide-angle storytelling.
Minor edge softness, chromatic aberration, and barrel distortion may appear under ultra-wide conditions.
We provide lens-distortion correction profiles for DaVinci Resolve and Adobe Premiere Pro.
This image is AI-enhanced for illustration. The actual product uses CNC-machined and 3D-printed components; appearance may differ, but optical performance is unaffected.
Notes & Warnings (Wide-Angle Adapter/ ND Filter Set)
- Attach only after gimbal self-check
The Mavic 4 Pro performs a lens-rotation sequence at startup.
The adapter may interfere with this motion. Install only after the self-check is complete, and remove it again before shutdown.
- Recommended for video use only — not suitable for panoramic matrix capture
Ultra-wide distortion affects spherical stitching accuracy. This accessory is intended for cinematic video recording.
- Optics sourced from brand-new DJI original components
Modified from the Mavic 3 series wide-angle lens and adapted via custom aluminum machining.
- DJI does not provide an official wide-angle adapter for Mavic 4 Pro
This upgraded module fills a gap that is unlikely to be addressed by future official accessories.
- Use with caution
Improper installation may interfere with gimbal movement. Follow safety guidelines for mounting and removal.
Free Evaluation Material (Pre-Purchase Samples)
To help users clearly assess real-world performance, we provide free downloadable test footage and photos, captured from the same flight position using both lens configurations:
- Single-frame RAW/JPG photos
- AEB 5-shot exposure brackets
- Flight-motion test videos (forward, backward, ascending, descending)
Suitable for evaluating:
• Optical behavior of the ultra-wide setup
• Distortion characteristics
• Differences versus the native 28 mm lens
• Post-production correction workflow (profiles included)
These optical accessories are provided as part of the PanoMatrix bundle for optional cinematic use. They are NOT required for automated panoramic capture processes.
Safety Notices & Required Pre-Flight Checks
A) Mandatory Read & Setup
- Read the manual carefully before the first flight. Do not rely on assumptions or “feel.”
- Flight mode must be set to Normal (N-mode). Do not use Sport mode while running matrix capture sequences.
- Image format must be DNG (RAW). Do not shoot JPG-only.
- Photo aspect ratio must NOT be 16:9. Use the standard (3:2 or 4:3) photo aspect ratio (do not crop to 16:9), otherwise stitching and coverage will be incorrect.
- Keep exposure consistent for the entire sequence (Manual exposure required).
Lock ISO / Aperture / White Balance, and adjust mainly Shutter Speed before starting. Do not allow auto exposure changes mid-sequence.
B) During Capture (Do Not Ignore)
- Monitor the aircraft and the live view for the entire capture. Never start a sequence and “look away.”
- Do not interrupt a sequence unless it is required for safety. There is no resume function; a partial set is typically unusable.
- Do not power off the RC2 controller while the aircraft is connected/in flight. This is dangerous.
- To stop a sequence on firmware V2.53, press and hold the Mode button for 5 seconds; the module aborts the capture and returns to the program menu. On first-generation firmware the module power toggle (module reset) was the only way.
C) After Landing (Data Protection)
- Back up the image data immediately after landing.
Copy to SSD/workstation and verify image counts before deleting anything from storage media.
- Keep at least two copies of the raw data (primary + backup) before proceeding to post-production.
Why We Recommend Shooting in RAW and Recording to Internal Storage
For this system, we strongly recommend recording panorama source images in RAW / DNG format and storing them in the aircraft’s internal high-speed storage whenever possible.
This recommendation is not based on the simple idea that one single RAW image will always look dramatically sharper or more colorful than a JPG when viewed casually. In many easy lighting situations, the difference may appear small at first glance. However, the real value of RAW becomes much more important in professional panorama production, especially when a large number of images must be stitched into one ultra-high-resolution result. Adobe’s documentation also emphasizes that RAW preserves more editing flexibility, especially for white balance and tonal recovery, while JPEG has many decisions already baked in.
1. Greater Dynamic Range and Exposure Latitude
Panorama scenes often contain bright sky, deep shadows, reflective surfaces, and strong contrast within the same capture sequence. In practical stitching work, this means the operator often needs to correct different brightness zones across the image set before stitching.
RAW files preserve more highlight and shadow information, which provides more room for recovering difficult tonal areas during post-processing. This is especially useful when the shooting strategy is to keep one fixed exposure across the panorama sequence and later recover a more balanced tonal result in post. In real workflow terms, RAW gives the operator a better chance of achieving an HDR-like balance from a single-exposure panorama sequence, while JPEG leaves much less room once highlight or shadow detail is clipped or compressed. Adobe’s materials describe RAW as retaining substantially more editable image information than JPEG.
2. Better White Balance and Color Temperature Control
One of the most important technical advantages of RAW in panorama work is white balance consistency. With JPEG, white balance is largely baked into the file. With RAW, white balance remains far more adjustable in post-production. This matters because even small shifts in color temperature or tint between frames can become visible after stitching, especially in skies, walls, pavement, and other large continuous tonal areas. Adobe explicitly notes that white balance flexibility is one of RAW’s strongest practical advantages.
3. More Stable Batch Processing Across the Full Image Set
A panorama is never judged only by one frame. It depends on the consistency of the entire image set. Experienced panorama workflows typically involve applying the same exposure, contrast, color, and noise settings across all frames before stitching. This is one reason RAW is preferred in serious panorama production: it allows more controlled and uniform batch correction across the full capture set. User workflows discussed in drone panorama communities commonly describe synchronizing RAW adjustments across all frames before exporting to TIFF and stitching in PTGui.
4. Better Support for High-End Post-Production and Ultra-High-Resolution Output
This controller is not designed as a casual accessory for small panorama output. Its real strength is enabling ultra-high-resolution panorama production, including workflows aiming at outputs up to approximately 250K width, followed by advanced stitching, retouching, KRpano tiling, and web deployment.
In this type of workflow, the quality of the source material becomes much more important than in lightweight 12K-class output. RAW files provide a stronger foundation for large panorama finishing, deep zoom viewing, heavy cropping, archival-quality output, and demanding post-production correction. PTGui itself positions its software specifically for seamless 360-degree spherical and gigapixel panoramic image production.
5. PTGui 13 and Improved RAW / DNG Handling
This recommendation is also reinforced by recent software development in the panorama field. PTGui 13 introduced improved RAW / DNG handling, including noise reduction, chromatic aberration correction, purple fringing correction, and a dedicated RAW Preprocess tab. PTGui also states that it can read and apply embedded lens correction profiles in DNG files from DJI drones, which can improve image quality further. For users working with DJI drone source material, this is a very meaningful technical improvement and strengthens the case for preserving DNG files throughout the workflow.
6. Why Internal Storage Is Recommended Over SD Card
Based on our practical testing, we recommend recording image files to the aircraft’s internal storage instead of SD card whenever possible. The reason is simple: for large multi-row panorama sequences, stable write performance is more important than convenience alone.
In real shooting conditions, the internal storage is generally more stable and faster than many SD card workflows for sustained capture. For a system intended for high-volume matrix shooting, this gives a safer recording base. Our recommendation is therefore to use the internal storage as the primary recording destination, and then back up the files immediately after each flight.
7. Storage Capacity in Real Shooting Practice
Based on our field experience, within a single battery mission it is possible to complete roughly the following set:
- one 6x panorama sequence: approximately 444 images
- one 1x panorama sequence: approximately 41 images
- one 2.5x panorama sequence: approximately 76 images
If battery remains, it is often still possible to shoot one or even two additional built-in panorama sets in the original app’s 1x lens mode.
In this type of capture workflow, the total storage use is typically in the range of 30+ GB and usually remains below 40 GB. For users purchasing the standard Mavic 4 Pro, the built-in 64 GB internal storage is generally sufficient to hold one full mission directly in the aircraft. In practice, this makes RAW shooting far more manageable than many users initially assume.
8. File Management Cost Is Real — But It Is Part of the Quality Trade-Off
Of course, RAW does increase storage cost, backup cost, transfer time, and file management pressure. That point is completely valid. However, these costs are part of the normal trade-off when the goal is the highest possible image quality and maximum post-production flexibility.
If maximum quality is not the target, and the final output is relatively small, then JPG can certainly be acceptable. But for users who want to extract the full value of this controller and push toward high-end panorama production, RAW remains the more technically sound recommendation.
9. When JPG Can Still Be Acceptable
If the scene is simple, the lighting is stable, the exposure is already well controlled, and the final panorama will only be output at relatively modest resolution, JPG may still be acceptable for a lighter workflow.
But this should be clearly understood: if the operator’s real target is only a small final panorama, then the built-in drone panorama workflow may already be sufficient in some cases. The true value of this controller appears when the goal is to go significantly beyond that level and enter a more advanced ultra-high-resolution production workflow.
Conclusion
We recommend shooting in RAW and recording to internal storage because panorama production is not only about how one single frame looks by itself. It is about preserving the maximum possible amount of image information across the entire capture set, maintaining stronger batch consistency, keeping greater recovery latitude in difficult light, and providing the best possible source material for advanced stitching and ultra-high-resolution output.
For lightweight output, JPG may sometimes be enough.
For high-end panorama production, RAW / DNG remains the recommended professional choice.
Notes & Warnings ( Wide-Angle Adapter / ND Filter Set )
1.Attach only after gimbal self-check
The Mavic 4 Pro performs a lens-rotation sequence at startup.
The adapter may interfere with this motion. Install only after the self-check is complete, and remove it again before shutdown.
2.Recommended for video use only — not suitable for panoramic matrix capture
Ultra-wide distortion affects spherical stitching accuracy. This accessory is intended for cinematic video recording.
3.Optics sourced from brand-new DJI original components
Modified from the Mavic 3 series wide-angle lens and adapted via custom aluminum machining.
4.DJI does not provide an official wide-angle adapter for Mavic 4 Pro
This upgraded module fills a gap that is unlikely to be addressed by future official accessories.
5.Use with caution
Improper installation may interfere with gimbal movement. Follow safety guidelines for mounting and removal.
ND Filter Installation Guide
In this kit, we provide a brand-new original Mavic 3 Pro ND set: ND8, ND16, ND32, and ND64, along with two carbon-fiber quick-release frames.
First, choose an ND filter and mount it onto the quick-release frame.
The frame has three holes that match the original filter tabs.
Align the holes and tabs carefully, then press until the filter sits flat and is fully secured.
Now you’re ready to swap.
Power on the drone and wait for the gimbal self-check.
Use two fingers to steady the gimbal tilt.
With your other hand, lightly press the original lens cover
and rotate it counterclockwise about five degrees to remove it.
Next, position our ND mount.
Keep the larger opening facing up and align it with the original lens.
Let it sit flush first, then rotate clockwise to lock.
Apply pressure only on the outer frame of the 3D-printed mount, not the glass.
Now the installation is complete.
Before takeoff, do a quick gimbal tilt and rotation test to confirm smooth movement.
After landing or changing the battery, please remove the filter assembly.
This is a cost-effective upgrade, but if the budget allows, we recommend DJI’s official ND filters.
They’re the easiest option—just install and power on.
Wide-Angle Lens Installation Guide
The wide-angle lens we provide is a modified original Mavic 3 wide-angle lens adaptor, with a CNC aluminum mount.
When handling it, avoid touching the glass.
Power on the drone and wait for the gimbal self-check.
Use two fingers to steady the gimbal.
With your other hand, gently press the original lens cover and rotate it counterclockwise about five degrees to remove it.
Next, hold the wide-angle lens by the outer frame with your thumb and index finger.
Align it with the original three-hole quick-release mount, slide it into place, apply light pressure, then rotate it clockwise about five degrees to lock.
Now the installation is complete.
Before takeoff, do a quick gimbal tilt and rotation test.
After landing or changing the battery,
please remove the wide-angle lens
to prevent damage during the next gimbal self-check.
One important note:
This wide-angle lens is recommended for single photos and video, but it is not suitable for matrix panorama shooting.
When you’re installing this for the first time, an imperfect fit may cause the installation to fail, and the gimbal may temporarily lose power and droop. This is normal—just restart the drone or wait about 20 seconds, and the gimbal should return to its normal position.
End of the document